This is for beginning Inkscape users. The pot is mostly manipulating shapes, while the tree requires drawing with a mouse. You need to know how to create circles, drag lines around, and follow keyboard shortcuts. The goal of this tutorial is be able to draw bonsai, so it goes through a lot of steps quickly. There are some very thorough tutorials listed at the bottom that cover each tool in depth. If you just want the Bonsai Elm svg file to download, go here.
Set up
I have the basic page with A4/letter size paper. No grids, and page visible, which can be adjusted in document properties (Shift+Ctrl+D). I found the number of buttons and controls a bit overwhelming when I was starting, so I have tried to break it down. This tutorial only needs three toolbars visible. I like keyboard shortcuts. The Commands Bar (Or the Edit menu) also accesses the duplicate command.
View → Show/Hide → Select: Snap Controls Bar, Tool Controls Bar, and Toolbox.
Part One: Draw a pot.
Pot lip
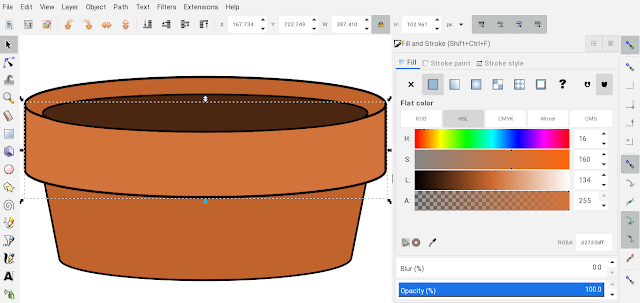
Use the circle (F5) to create an oval. Bonsai pots are wide and shallow.
The circle fill (Shift+Ctrl+F) is RGBA color code c0632cff, and the stroke paint is set to black, RGBA color code 000000ff.
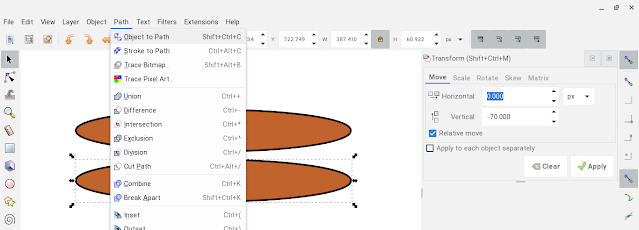
Select the oval and duplicate it (Ctrl+D). Move the duplicate oval down by dragging it, using the down arrow on your keyboard, or using the transform dock (Shift+Ctrl+M) to move it down vertically.
Select (F1) the duplicate oval on the bottom and change it from an object to a path (Shift+Ctrl+C).
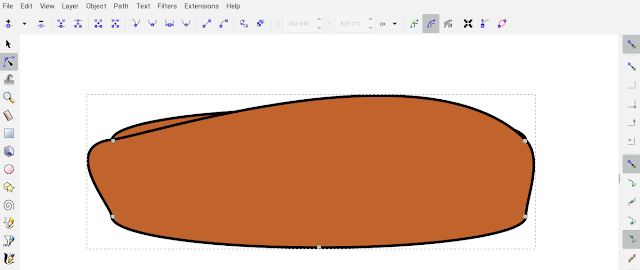
Select the duplicate oval and select edit path by Nodes (F2). You should see nodes along the oval. Add one node on the upper half of the bottom oval by double clicking along line.
Enable snapping for the quadrant points of eclipses.
Use the edit path by nodes tool (F2) to snap the two nodes on the top of the oval to far edges of the oval above it.
Use the straight line button on the node toolbar to straighten the top and sides.
Object → Lower (Page down).
Pot body
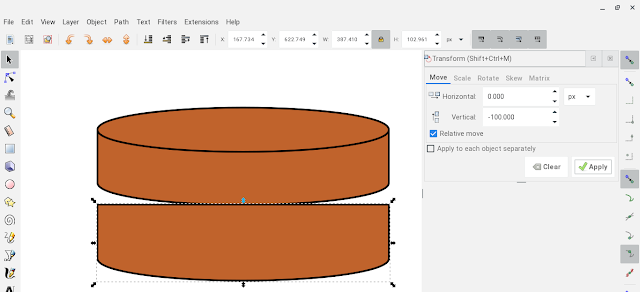
Select the piece you just lowered and duplicate it (Ctrl+D). Move the duplicate down by dragging it, using the down arrow, or using the transform dock (Shift+Ctrl+M) to move it down vertically.
Select the new piece and use Transform (Shift+Ctrl+M) Scale to reduce the size, or adjust the size with the corner arrow (this is easier if the ratio of the piece is locked).
Enable snapping to cusp nodes.
Use the edit path by nodes tool (F2) to snap the two nodes on the top of the new piece to the edges of piece above it.
Select the new piece and use Transform (Shift+Ctrl+M) Scale to reduce the size, or adjust the size with the corner arrow.
Object → Lower (Page down).
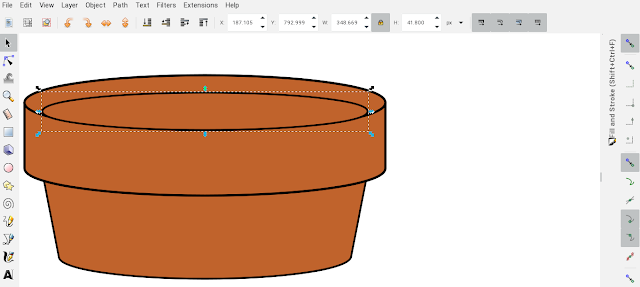
Dirt: Duplicate (Ctrl+D) the original top oval. Select the new piece and use Transform (Shift+Ctrl+M) Scale to reduce the size, or adjust the size with the corner arrow.
Drag the dirt down, snapping quadrant point to quadrant point with the original oval.
Reduce the height of the dirt oval using the top arrow from the selector tool (F1).
Final coloring (Shift+Ctrl+F).
Dirt: RGBA 4b2711ff
Pot lip: RGBA d2733bff
Pot body: RGBA c0632cff
Select all (Ctrl+A). Group (Ctrl+G). Adjust the stroke paint (Shift+Ctrl+F) to no paint to remove the lines. This can also be accomplished by setting the stroke width to zero.
Part two: Draw an elm tree.
Tree Trunk
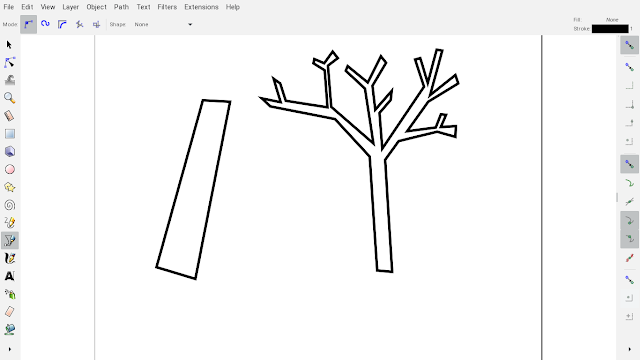
Use the Bezeir tool (Ctrl+F6) to draw a tree trunk. It is also possible to use the freehand drawing tool for this, but that will generate a lot of nodes. The menu Path → Simplify (Ctrl+L) will help if you choose this route, but the more nodes there are, the slower Inkscape will run. This tutorial can help with slow loading or crashing issues.
A basic polygon or rectangle is all that is really needed for a tree trunk. The leaves are going to cover the branches. I prefer to have branches, because it looks nice to have them peeking out from between the leaves here and there. Bonsai should have thick, interesting trunks.
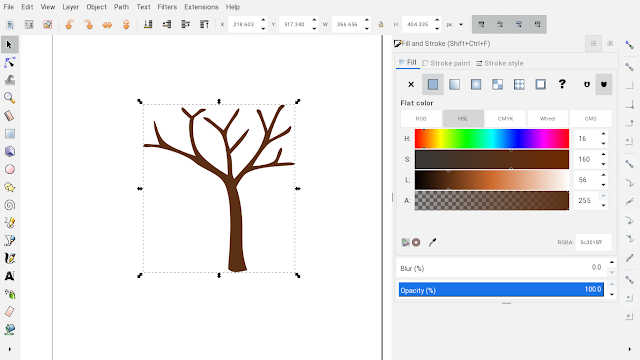
I used the Bezeir tool (Ctrl+F6) in Regular Mode to create the drawings above. I'm keeping the more complicated drawing (Select the object or path and press Backspace to delete it), and using the edit path by Nodes tool (F2) to smooth it out and make it more interesting and tree-like. It is helpful to toggle the snaps off (%).
No step-by-step for the Node editing because there isn't a wrong way to do this, as long as the end result vaugely resembles a tree. Roy Torley did a very thorough tutorial on the Pen/Bezeir and Node tools. The branches are optional, and will be covered by leaves.
Using the paint menu (Shift+Ctrl+F) set the stroke paint to no paint to remove the lines, and set the paint fill for the tree to RGBA 5c3015ff.
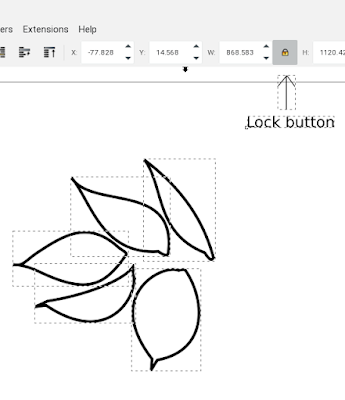
Tree Leaves
 |
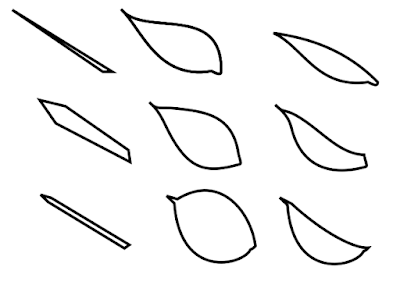
| Elm tree leaves, by MPF, CC BY-SA 3.0 |
Optionally, duplicate (Ctrl+D) the leaves and flatten on the top edge with the edit Nodes tool (F5) to create half leaves.
Choose the best leaves, and move and rotate them to form a nice bunch. Click on an already selected (F1) object or path to turn it, or use the move buttons, or the Transform (Shift+Ctrl+M) Dock
Select all object on the page (Ctrl+A) and hit the lock button so nothing is warped as it is moved around.
Select just the leaves. Group them together (Ctrl+G). Using the paint menu (Shift+Ctrl+F) set stroke paint to no paint to remove the lines, and set the paint fill for the leaves to RGBA 3b5a15ff.
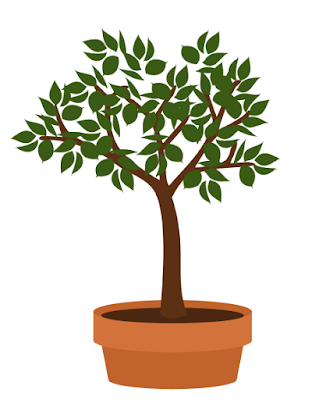
Adjust the sizes of all the objects until they look correct, and assemble the bonsai. Select and transform objects: F1. Transform dock: Shift+Ctrl+M. To raise or lower object use menu: Object → Lower (Page down) or Object → Raise (Page up). Flip vertically: v, flip horizontally: h
Duplicate (Ctrl+D) the group (Ctrl+G) of leaves. Move the duplicate copy to another spot and adjust the rotation if needed. Repeat this until the tree has at a blanket of leaves.
Duplicate (Ctrl+D) a set of leaves and set the paint fill to RGBA 466b19ff, which is a lighter green. Add another blanket of leaves in the new color.
Duplicate (Ctrl+D) a set of leaves and set the paint fill to RGBA 54811eff. Add another blanket of leaves in the new color. The layers of different color leaves create depth.
Helpful Inkscape keyboard shortcuts:
- Bezeir tool: Ctrl+F6
- Delete: Select unlucky object or path, Backspace
- Document properties: Shift+Ctrl+D
- Duplicate: Ctrl+D
- Edit path by nodes: F2
- Flip horizontally: select+h
- Flip vertically: select+v
- Create circles, ellipses, and arcs : F5
- Fill and Stroke: Shift+Ctrl+F
- Group: Ctrl+G
- Lower object: Page down
- Object becomes a path: Shift+Ctrl+C
- Raise object: Page up
- Save: Ctrl+S
- Select and transform objects: F1
- Snaps on/off: %
- Transform: Shift+Ctrl+M
- Undo: Ctrl+Z
- Ungroup: Ctrl+Shift+G
- Zoom in: +
- Zoom out: -
- Zoom to drawing: 4
- Zoom to page: 5
I'm running Inkscape 0.92.4 on Chromebook's Linux Beta.
For more information on bonsai check out Peter Chan’s youtube channel, Herons Bonsai. [Warning: This is one of those fascinating internet rabbit holes that can contribute to overaccumulation of tiny trees.]
Official Inkscape tutorials are here.
The Official Inkscape Beginner's Guide is here.
Roy Torley created some very comprehensive tutorials here.



















Comments
Post a Comment